How to Create Firewall and Security Settings for Quickbooks Desktop

QuickBooks Desktop is an essential tool of use for most businesses and provides full features of financial management. However, these mounting cybersecurity threats necessitate the need to secure your QuickBooks setup more than ever. One crucial step toward protecting the financial data of your firm is the configuration of your firewall and security settings. This blog will walk you through that how you can configure firewall settings for QuickBooks to set up multi-users in QuickBooks step by step.

Understanding Why You Need Firewall Settings
Firewalls would sit between your computer
and the threats from the internet. They can monitor incoming and outgoing
network traffic and can block malicious activity. Properly configuring your
firewall will ensure that the QuickBooks Desktop application is allowed to
communicate with the services it needs but keeps unauthorized access away.
Step 1: Prepare Your System
Before jumping into the world of firewall
settings, ensure QuickBooks Desktop is up-to-date. Updates often contain
security patches that will protect your system from other possible threats.
Find
Updates:
●
Firstly, Open
QuickBooks Desktop
●
Then Click on Help Button
●
Update QuickBooks
Desktop
●
Apply
any updates available to you
Backup
Your Company File:
●
Always backup data
before doing large changes
●
Go to File > Back Up
Company > Create Local Backup.
●
Saving the backup
safely requires you to follow the instructions given below.
Step 2: QuickBooks Ports
QuickBooks employs some specific ports,
and you will have to allow them via your firewall. QuickBooks may use the
following common ports,
●
Port 8019: QuickBooks
Database Server Manager
●
Port 56727: For
QuickBooks application
●
Port 55355-55357: For
extra functionalities
Notice these ports because you will need
them in the subsequent steps.
Step 3: Windows Firewall Setup
3.1.
Windows Firewall Settings Open
Access
the Control Panel:
●
Click on the Start menu
●
Type Control Panel and
press Enter
Access
Firewall Settings:
●
Click on System and
Security
●
Click Windows Defender
Firewall
3.2.
Allowing QuickBooks Through the Firewall
Allow
an App or Feature:
●
From the left, click
Allow an app or feature through Windows Defender Firewall.
●
Next, click on the
Change settings button. You may require administrator rights.
Add
QuickBooks:
●
Click Allow another
app.
●
Open the installation
directory for QuickBooks (typically C:\Program Files (x86)\Intuit\QuickBooks <version>\).
●
Highlight QBW32.EXE
(the main QuickBooks executable).
●
Add. Both Private and
Public boxes should be checked at this point.
3.3.
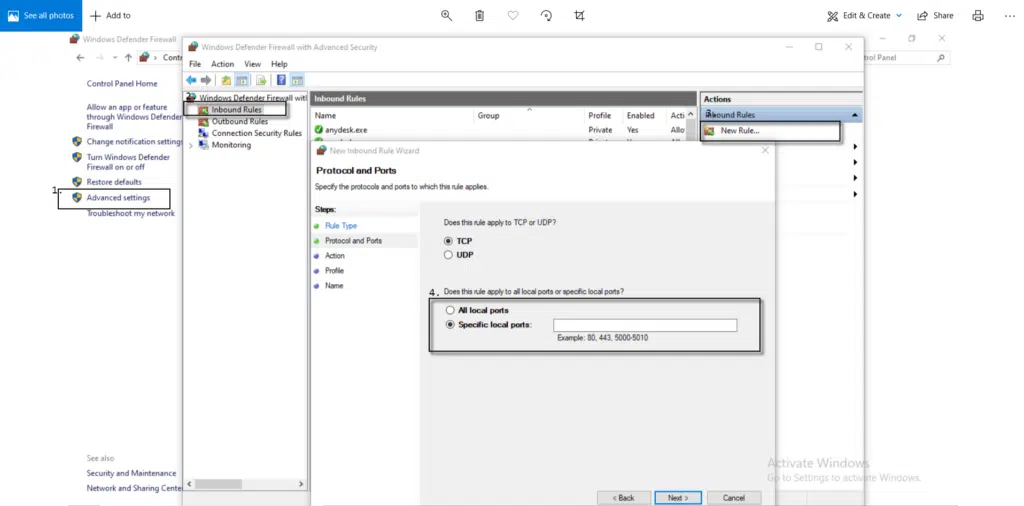
Opening Particular Ports
Advanced
Settings:
●
Open Windows Defender
Firewall again. From left hand menu, click Advanced settings
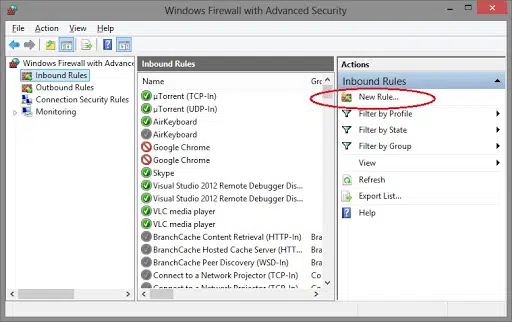
Inbound
Rules:
●
Highlight Inbound
Rules, then click New Rule. on the right side.

●
Select Port, and click
Next.

●
Select TCP and enter port numbers (8019,
56727, 55355-55357) in the field labeled specific local ports. If you have more
than one port, separate with commas
●
Click Next, Allow the
connection, and then click Next.
●
Choose your time to
when the rule should take effect : Domain, Private, Public and Next
●
Naming your rule that
you would give it a name such as QuickBooks Ports and Done
Outbound
Rules:
●
Follow the same
instructions for the Outbound Rules
Step 4: Third Party Configuration
If you have another, third-party firewall
(such as Norton, McAfee, or several others), you will need to do these settings
there also. Generally speaking, though, these tend to work in pretty much the
same way:
●
Other Firewalls
●
Open Your Firewall
Software.
●
Locate Application
Settings or Network Protection.
●
You're going to allow
applications through the firewall.
●
QuickBooks and allow
them to use the appropriate ports - 8019, 56727, and 55355-55357.
●
Save your changes.
For more detailed instructions you should
refer to the documentation for your specific firewall software.
Step 5: Adjusting QuickBooks Security Settings
QuickBooks also offers you security
settings that you can turn on:
●
Open QuickBooks
Desktop.
●
Go to Edit >
Preferences.
●
From the left menu
choose Security
●
Turn on Require
password to log in and input a good password
●
Set permissions for
other users under the User List
Step
6: Testing Your Setup
In conclusion, with a configured firewall
and security settings, now test everything:
●
Open QuickBooks and
ensure it connects appropriately with your company file without any problems.
●
Check for error
messages Firewall setting errors
●
If there is something
wrong, then return to the settings of the firewall and confirm that any changes
that have been made were actually committed.
Conclusion
Securing your QuickBooks Desktop firewall and security settings is very important
to the protection of your business's financial data. And here's exactly how you
can fortify the defenses against those lurking threats while still allowing
QuickBooks to operate smoothly: Always update your software, however, if that isn’t the case, all
you need to do is to get on a call with our QuickBooks technical support professionals using the support
line. Our customer executives will be more than interested in answering your
queries associated with this accounting software.


Comments
Post a Comment